Wednesday, September 21, 2011

"fun little fundraisers"


Hi everyone,  happy Wednesday!  Since the rainy weather kept us indoors today, my crafty friend Sue & I decided to each create at least one new project and blog about it...for fun.  I've been kicking around some ideas for small ticket items to sell at the PAWS (Partners of Animal Welfare Society) booth for Fall Fest in our town this weekend.  I already created some fun "carmel apple pops" favors earlier in the week so I decided to stick with a Fall candy theme for my projects.  So first here's a look at the carmel apple pops.......
I started with a bag of tootsie pops in caramel apple flavor and used my cricut & the doodlecharms cartridge to cut apples from green patterned papers.  Next I handcut the "caramel" topping from kraft cardstock and added foam tape to the back for a little more dimension.  I adhered the caramel piece and a small button to each apple & used more foam tape to adhere the apples to the tootsie pops (with the sticks pointing up.)  Then I slipped the apples into a small cellophane bag and tied it with a piece of twine, a clothespin comes in handy to hold the bags closed while you tie the twine!  I used my new stamp set from Papertrey Ink to stamp the little labels & sentiments (I love their stamps, so clever how they work with each other) and adhered them to the outside of the bags with a dab of craft glue.
I finished each one off with a color ribbon bow & piled them in a basket...I love how they turned out and I think they make a fun Fall treat  :>  My next project started with a bag of Dove Bar single bites, minus one or two (I had to check the quality! LOL)   I just love all of the color Fall mums this time of year and was inspired to create a flower favor.  So I used my big punch and some brown patterned papers to punch the basic shape and then used a circle punch & some gold papers for the flower centers, easy peasy!!!  I inked the yellow centers to make them stand out a little more and then used my same little stamps to add the sentiments.  I added a little bling to the circles and adhered them with a small strip of foam tape.  A bright, yellow bow adds a cheerful touch.  To create the favors I adhered the flowers to the flat side of the candies with glue dots.  I arranged them on a doily-lined baking sheet & they look like little cookies :>


After making just over 2 doz. of these, sadly I ran out of Dove bites :o(   so onto the next idea!  Now I'm down to my last 2 bags of candy...some Mary Janes in cool new flavors & colors that I've never seen before.  Looking at the colors I was reminded of fall leaves & acorns & the like so I went in search of an acorn shape in my cricut cartridges and lo & behold there was one on the doodlecharms cartridge (this is a great cartridge, it has basic shapes for nearly every season/holiday.)  I did run into an issue with cutting the acorns...they could only be cut with a group of shapes: a leaf & a small berry,  so I decided to add some leaf-shaped favors too. Next I went to my stack of favorite go to papers, the BoBunny Dots collection and found some deep, rich fall colors to use.  Since I wanted to cut  my leaves in different colors I also ended up with acorns in several colors & decided I liked them in these fun, funky colors!
I also cut a sheet of leaves & acorns in a tan color and cut the acorns apart and layered the tops & bottoms over the colored ones.  I inked the edges of all and added a little tiny bit of bling to match.  I love my silly colored acorns  :>   I think I may add a little twine bow to the leaves or maybe stamp a sentiment on them. 
Attaching the paper acorns & leaves to this type of candy wrapper (waxed paper) proved to be a challenge and in the end I found that good, ole masking tape did the trick!  I had so much fun, on this gloomy rainy day, creating these favors & spent most of the day working on them.  Things just seemed to go together quickly and I was so pleased with the finished items...it reminds me of something my grandmother used to say  "when you set out to do right, God will guide your hands" and today was a perfect example of how right she was!  I hope you all have a good evening & don't forget to count your blessings  :>    delisa

Thursday, September 15, 2011

the perfect tomato sandwich (southern style, y'all)

Hello again my friends!  It's been a long, long time since I last blogged (computer issues & a whole bunch of other stuff....Life!)  but I hope to start my blog again with some fun new projects for the upcoming seasons.  But before I do that I must pay tribute to our last tomato harvest of the season....boo hoo hoo!  I do so hate to see them go :(     So I thought I would share with you how to make the perfect tomato sandwich, southern style y'all.  Now right off the bat, don't even think about making this without  some perfectly ripe, delicious, homegrown tomatoes.....it's just not done, ever!  I don't know what those look alike things are that they sell in the grocery stores but they're not tomatoes.  So here's what else you'll need:  some plain ole loaf bread (white or wheat, whatever you like best), some good cheddar or colby cheese (kraft singles or velveeta slices are just fine too), your favorite mayo, yellow mustard (I like Heinz when I can find it, but French's is good too), some fresh, crispy lettuce & a little salt & pepper (for the maters!) 
Okay, so here we go.  First spread the mayo on both slices of the bread.  Next add a little of the yellow mustard to one slice of the bread, just go ahead & smear it right on top of the mayo, they like each other!  Then add a slice or two of cheese to the bread and your fresh lettuce to the other slice of bread.

Now take some good, thick slices of tomato and salt & pepper them to taste and put them right there on the nice little bed of lettuce.  Putting them in between the cheese & lettuce keeps your bread from getting too soggy before you finish eating your sandwich! 
Now put the slices of bread together and cut your lovely sandwich in half, & don't worry if you get a little dent in the bread while you're cutting it (like I did) it still tastes really good!
mmmmmmmmmm......I told ya it was good!

This is one of my favorite summertime sandwiches and I ate plenty of them growing up & I still love them!  Now you can fancy them up with dijon mustard, or specialty cheeses or breads from the deli but a good ole southern style "mater" sandwich is hard to beat on a hot summer day or anytime you're lucky enough to have good, homegrown tomatoes.  In my pre-vegetarian days I would throw a piece of good thick-sliced bologna on there & be in hogg heaven (ugh, sorry!)  but if your maters are good you really don't need it!  So that's all there is to it.  Like a lot of good eats, it's the freshness of the ingredients that make this simple sandwich so tasty and a true summertime treat. 
One more quick little note, this sandwich can be a little messy to eat (on account of the ripe, juicy maters) so grab plenty of napkins.....or if no one else is around just stand over the kitchen sink & eat it!  Enjoy them while you can  :>     delisa

Monday, April 18, 2011

mail art :)

   Happy Monday!  It's a beautiful morning here and the start of a busy week before the Easter holiday.  I love celebrating the holidays and have been making cards to mail & sweet treats for the little ones in our family.  I really enjoy baking & candymaking for these special occasions and creating pretty packaging for the treats.  I always keep a supply of cellophane bags in different sizes on hand, it's so easy to add some colorful ribbon and a little tag for a fun presentation.
   Most of my cards include bulky items/embellishments and rarely fit into a regular envelope so I often wrap them in tissue and mail them in plain, old manilla envelopes.  But the envelopes look so boring & give no clue to the goodness that lies inside!  I've noticed that our Post Office is now selling colorful, decorative boxes & envelopes but they can be very pricey and often cost as much as the handmade cards I'm sending.  So I decided to see if I could dress up my plain envelopes a little and  I wanted to make sure that they would go through the handling process and still look good when they arrived.  So I started by painting them with paper paint (regular acrylics have alot more water in them & can cause the envelopes to wrinkle).  I just brushed the paint on with a foam brush and let it dry for a few mins., this doesn't take long at all.  Next I die cut a flower from patterned paper and a center from solid paper that is large enough to write the name & address of the recipient.   I adhered the flower with a strong adhesive and also added tiny dots of craft glue around the edges to make sure that it stayed put.  For the return address I used a journaling block that I cut in half to fit and adhered it in the same way.  You could run these through a Xyron if you have the big one and that would work well also.
   I added paper to cover the envelope flap and a border along the bottom that I cut with decorative scissors.  Lastly I stitched around the entire envelope & flap, staying close to the edge. 

   I love how it looks and when I took my decorated parcels to the Post Office the clerk thought they were very cute & had to show them to all of her co-workers, I was a little embarrassed but mostly pleased at the attention they got. This was really easy to do.  Wouldn't it be fun to open your mailbox and find something besides the usual plain old mail, I think so :)

   On a personal note, in the past few weeks so many of my friends & family have been going through very difficult times.  Some have lost family members, one friend lost her beautiful home in a fire and my dear, sweet Aunt underwent a major surgery.  It really does seem like troubles come in groups sometimes.  I came across this quote recently and it really hit home:   "thy fate is the common fate of all, into each life some rain must fall".  Difficult times can be hard to weather but it does make you truly appreciate the good times and the blessings in our lives.  For all of my friends & family I continue to send my love & prayers to you and hope that time will begin to heal some of the hurt.  delisa

Tuesday, April 12, 2011

early bloomers!

   oh Spring!  It's almost here, I know it's trying.....the signs are everywhere!  The grass is getting lush & green, the bulbs are blooming, robins are hopping about; all we need is a little more warmth & sunshine & we'll be there  :>   I'm so excited this year because our new Bradford Pear trees are blooming for the first time & they're just beautiful!  We've lost several big trees over the past few years from our front yard and it was looking bare, so for our anniversary last summer Randy surprised me with two new flowering trees.....his & hers  LOL  I love looking out my windows & seeing their beautiful, white blooms.  This spring I'm going to add a few Forsythia bushes, another early bloomer (with a little TLC you can force some early blooms to enjoy indoors as early as Feb. - love that!)  So here's a few pics. of my new beauties.

   I know I sound way too excited about some trees but those who know me know that I truly am a "tree hugger"  LOL  I remember celebrating the very first Earth Day.....our class went & cleaned up a park near our school.  I loved it & I still love the idea of Earth Day & I celebrate it in some small way each year, it's probably something we need now more than ever before.  So if you can, try to do a little something for Earth Day (April 22nd) if you get the chance, Mother Nature will surely appreciate it!
   Now for some blooms of the paper kind.   I have a spring-y card to share today that has lots of fun flowers.  Starting with this blooming paper from Basic Grey, such great colors, I love it!  I also used a cool printed flower & layered it with a fun handmade flower and finally a teeny, tiny, bling-y little bloom to accent the simple sentiment. 

   I also used some pp's from Paper Studio & Daisy D's (this fun green check is one of my all-time favorites!) as well as journaling spots from CTMH, tiny-type alpha stickers from Cosmo Cricket and these great chipboard borders that I got on clearance at Archiver's.  With it's sweet, simple message I think this card could be used for many occasions.

   So hopefully our chilly, breezy days are dwindling away and soon Spring will be in full swing.  Until then I'll just keep creating with my paper flowers & dreaming of warm, sunny days and playing in the dirt with some real bloomin' beauties.  Have a great day and thanks for looking,  delisa

Thursday, April 7, 2011

having fun with punches

Hi everyone!  I know it's been too long since I posted on my  blog, again!  But with so many projects going on around the house & spring cleaning underway also my time to craft & blog is limited these days.  But I do have some fun little mini cards & a few tags to share with you.  I love using flowers on my cards, especially for spring cards and I love all of the cool handmade flowers people are making these days, some of them take a little practice but many of them are very easy to do.  And if you still think you can't make handmade flowers yourself then I have some that I guarantee you can do.....quick & easy!!!
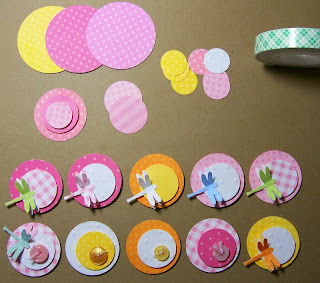
  I always save my paper scraps & have too many of them, so when I can I use them for little projects like these.  First I selected 3 different size circle punches & one of my favorite MS punches:  this cute little dragonfly.  I raided my box of scraps & punched & punched until I had a collection of pretty patterns to work with.  For the flowers I stacked the circles with a little foam tape in between each layer to give them some dimension.  I added a little button to some of the flowers also.

  For the dragonfly I punched 2 for each one and adhered the body section together & left the wings free so that I could score & bend them up to show the layer underneath, this looks good when you use 2 different colors/patterns for the layers.  Then I let a few of them land on my flowers just for fun!  I love how they looked all lined up on my desk waiting to take flight  : > 

   Now you have to admit these are about the easiest handmade flowers that you could ever create and most all of us have several sizes of basic circle punches in our supplies so next time you want to make your own embellishments.....piece of cake!  The dragonfly punch is too cute & I just love it but MS also has several butterfly punches that make adorable little additions to cards & projects.  So here's what I did with all of my fun decorations, more mini cards!  I have just had a ball making these tiny little (3" square) cards and I can't seem to stop!  LOL  I started with kraft cs (another thing I can't seem to stop using lately) and some more scraps from the stash box for the background papers.  I added my circle flowers, some hand cut leaves which I curl up a little for more dimension and grass made using Fiskars's cloud scissors and accented with a few stitches in a beautiful spring green.
   I picked up some pretty floss recently and want to start adding more handstitched accents to my cards but I also like to use it as I did on these for just a hint of color & a tiny bow.  It reminds me of the baker's twine that is very popular with crafters right now!  The stamped sentiment is from one of the little clear stamps sets by Hero that I've had for awhile.  I love this sweet little message, just right for spring  :>


   I also added some of my handmade goodies to a couple of tags for some fun, spring looks;  I may be using some of these on Easter goodies for my family & friends!  I also did one more little card to add to my collection, I just wasn't ready to stop  LOL

   I love the bright, fresh colors of spring.....I kept these cards & tags on my desk for days just enjoying looking at the cheery flowers, they just make me smile!  One more picture to share with you, it's something that makes Randy smile.....FOOD!  He loves my homemade mac & cheese and was so disappointed when he came home last week and I told him the big pan of mac & cheese I had just taken out of the oven was not for us but for a friend's family.  Soooooo, this one's for you baby!  gotta keep my guy happy LOL
   Yummmmm, it was good too!  It didn't last very long but there's plenty more where that came from.  So that's my post for today, I know it was kind of long but I hope you enjoyed it and when you get some time to play get out those punches and make some spring lovlies for yourself!  Have a great day & enjoy our beautiful weather while it lasts!  Thanks for looking & I'd love to hear any comments you might have,  delisa

Tuesday, March 15, 2011

sweet spring pockets

   Hi everyone!  I'm sorry it's been a little longer than I wanted since my last post, but I'm back with a fun spring project to share with you.  But before I do that I just can't go on without saying how much my heart & my prayers are going out to the people of Japan and the terrible, terrible tragedy that their country is dealing with.  The images & the stories coming out of there are just heartbreaking.....this morning I saw on tv an elderly man who was riding around on a bicycle with his wife's name & pictures of her all over his bike as he desperately searched for her and I can't even begin to imagine how he feels but I pray that he & all of the others who are suffering will get some kind of aid & relief soon.  As for his finding his wife, that's in God's hands.  If you are so inclined please pray for the nation of Japan & it's people, animals & land.  Sometimes that's all that we can do.....but it definitely IS something that we can ALL do.
   It seems trivial to think about working on crafts & things like that when so many are suffering but doing what is normal is the way that many of us cope with what is overwhelming to accept, so I'm doing something that is usually a part of my daily routine (along with laundry & other fun stuff like that!)
   So here is a fun little project that you could use to give small cards, tags & little treats to brighten someone's day or just to celebrate the (hopefully soon) coming of spring.  I have a pretty good supply of little paper sacks in different colors & sizes and I like to use them occasionally to see what kind of different projects I can do with them.  I made a few of these pockets around the holidays as gifts for friends & used brown paper bags so I thought it would be fun to do them in cheerful spring colors too.  So I some med. & small bags & trimmed the tops with my favorite "clouds" scissors.


  Next I folded up the bottom edge and stitched just a little way up each side (so that that I would have room to add some fun things).  Then I added a small patterned paper liner to the back, it doesn't go all the way to the bottom so it's easy to adhere.
   Aren't the little ones cute!  Next I cut some strips of paper & pleated them by hand & stitched down the center to secure them.  I added the paper ruffles along the top open edge of the pocket.  I went to my stash & gathered some chipboard flowers (I've had them awhile & don't remember where I got them but I'm happy to finally find a home for them  :>   I was going to layer them with these white embossed flowers but I tried some punched circles instead & I liked the added bit of color. 
   I layered the punched circles with foam tape between them for a little more dimension.  I love for things to be chunky, dimensional & look like they have some movement to the paper (like the ruffles.)  I gathered a few more things such as buttons, some pretty pink floss & I used one of my favorite little Sizzix dies to cut "bloom" from some scraps of the patterned papers.  I finally got around to picking up some little wooden clothespins at M's that I've been wanting to alter & use on my projects.  I just used my ink pads to lightly tint the clothespins.....I do front & back(???) then I let them dry and later add the tiny dots with white paint & the tip of a stylus.

   I adhered the layered flowers to the left side of the ruffled strip & the "bloom" sentiment in the bottom right corner.  If the paper is thin that you want to use for the sentiment cut an extra one out of scrap cs & adhere the two together for a thicker, stronger piece.  I even tried die cutting a sentiment from pink felt & it worked just fine  :>   hmmmmm.....I've got a pile of felt, this could lead to some marathon die-cutting sessions, we'll see!  I added one more fun thing to my embellies, I punched some little dragonflies from white cs with a MS punch, love her punches...very well made!
  So the final touch on my pockets was to add the clothespins & adhere a button tied with a bit of floss to top the flowers.   I love these handy little guys.....they can hold a small card or tag, even a yummy bit of chocolate (like the individually wrapped Ghiradelli chocolate bars  :>)   You can make these with pretty much any size bag you want, what a fun way to recycle those brown bags we all have a few of .

   I just love the silly little dragonfly...it's my favorite thing!  I don't know, whatever  :>   So I hope you enjoyed taking a look at my spring pockets & I hope it made you smile just a little too.  And for those of us living in the midwest:  hang in there, baby!  I'm sure spring is just around the corner.....I've been seeing some robins in my yard and the grass & woods are slowly greening.  Have a great day & happy crafting to all,  delisa

Friday, March 4, 2011

Thrifty Crafting

   Hi everyone,  Happy Friday!!!  It looks like a rainy weekend but we have alot of things planned so the show must go on  :>   The fun part is tonight.....dinner & a Pink Floyd concert (tribute band), it should be alot of fun & we're definitely looking forward to it.  Saturday & Sunday will be work days as we are finishing the rest of our basement (yep, I know more remodeling.....why do I do this to myself?) and have lots to do there.  It should be great when we get finished & I'll have to post some pics.  I may have to have another Spring Fling for the MM girls  :>
   Now for something a little more fun.  I've been on a mission for the past year or so to pare down some of my huge stash of craft supplies & scraps of papers & embellishments leftover from other projects so I try to do a "scrap craft" once a week using these items.  This week I chose to use a pkg. of cute chipboard from K&CO that I picked up on clearance.  When I opened the pkg. I noticed how cute the cardboard backing was & since it was fairly lightweight I decided to use it too on my projects, which makes the buy an even better deal.....now that's being pretty thrifty I think!  My husband would be proud of me.  So I also selected some scraps of kraft cs & pastel patterned papers from my stash, a little rick rack (which I have in many colors, it's kind of a staple for me) along with some pretty pink buttons.....something else I have tons of, a little light pink floss and some tiny alpha stickers from MM that I also got on clearance and have used on many projects.  I gathered all of my goodies  together in front of me & was inspired to make some spring cards   :>  I had enough kraft paper scraps to make some 3" cards & also one 4" card.


   First I cut & scored my cards & rounded off the top right corners with a punch.  Then I cut tiny pieces of the cool pkg. backing and added that along with a scrap of dotted green paper cut with Fiskar's "cloud" scissors (I love these.....they're probably my most used decorative scissors!).  I was trying to figure out where to use the bright pink rick rack & so I tried it around just half of the card & liked it just like that!  There wasn't alot of room on the cards for a ribbow bow, which I add to most of my cards, so I just used some of the pink floss to make a tiny, just barely there little bow  :>  For the 4" card I used just a little square of the background paper & a scrap of blue dotted paper cut with a scalloped edge.  This time I used the floss tied around the journaling block.

   The next step was adding the cute chipboard pieces.  They might seem kind of large scale for such tiny little cards but I think they work just fine.  I added a pink button to the floss bow & used the alpha stickers to spell out the sentiments.  The stickers were almost the same color as the background so I decided to pop them up with foam tape to make them stand out a little more.  I had a few colored alphas as well and used them along with another leftover sticker to spell out the " hi u".  These were fun to make and I LOVE using things I have on hand or have had for awhile.


   I was going to decorate these cute envelopes I found at Archiver's but the cards ended up being too wide to fit so I came up with a fun solution which I'll show you in my next post.  So I hope you like my little cards and challenge yourself to do some "scrap crafting" of your own.  I still have supplies leftover from this challenge and have another cute project to share with you but that won't be until next week.  Hope you all have a great weekend & try to fit in a little crafting time if you can,   delisa   :>