Monday, April 18, 2011

mail art :)

   Happy Monday!  It's a beautiful morning here and the start of a busy week before the Easter holiday.  I love celebrating the holidays and have been making cards to mail & sweet treats for the little ones in our family.  I really enjoy baking & candymaking for these special occasions and creating pretty packaging for the treats.  I always keep a supply of cellophane bags in different sizes on hand, it's so easy to add some colorful ribbon and a little tag for a fun presentation.
   Most of my cards include bulky items/embellishments and rarely fit into a regular envelope so I often wrap them in tissue and mail them in plain, old manilla envelopes.  But the envelopes look so boring & give no clue to the goodness that lies inside!  I've noticed that our Post Office is now selling colorful, decorative boxes & envelopes but they can be very pricey and often cost as much as the handmade cards I'm sending.  So I decided to see if I could dress up my plain envelopes a little and  I wanted to make sure that they would go through the handling process and still look good when they arrived.  So I started by painting them with paper paint (regular acrylics have alot more water in them & can cause the envelopes to wrinkle).  I just brushed the paint on with a foam brush and let it dry for a few mins., this doesn't take long at all.  Next I die cut a flower from patterned paper and a center from solid paper that is large enough to write the name & address of the recipient.   I adhered the flower with a strong adhesive and also added tiny dots of craft glue around the edges to make sure that it stayed put.  For the return address I used a journaling block that I cut in half to fit and adhered it in the same way.  You could run these through a Xyron if you have the big one and that would work well also.
   I added paper to cover the envelope flap and a border along the bottom that I cut with decorative scissors.  Lastly I stitched around the entire envelope & flap, staying close to the edge. 

   I love how it looks and when I took my decorated parcels to the Post Office the clerk thought they were very cute & had to show them to all of her co-workers, I was a little embarrassed but mostly pleased at the attention they got. This was really easy to do.  Wouldn't it be fun to open your mailbox and find something besides the usual plain old mail, I think so :)

   On a personal note, in the past few weeks so many of my friends & family have been going through very difficult times.  Some have lost family members, one friend lost her beautiful home in a fire and my dear, sweet Aunt underwent a major surgery.  It really does seem like troubles come in groups sometimes.  I came across this quote recently and it really hit home:   "thy fate is the common fate of all, into each life some rain must fall".  Difficult times can be hard to weather but it does make you truly appreciate the good times and the blessings in our lives.  For all of my friends & family I continue to send my love & prayers to you and hope that time will begin to heal some of the hurt.  delisa

Tuesday, April 12, 2011

early bloomers!

   oh Spring!  It's almost here, I know it's trying.....the signs are everywhere!  The grass is getting lush & green, the bulbs are blooming, robins are hopping about; all we need is a little more warmth & sunshine & we'll be there  :>   I'm so excited this year because our new Bradford Pear trees are blooming for the first time & they're just beautiful!  We've lost several big trees over the past few years from our front yard and it was looking bare, so for our anniversary last summer Randy surprised me with two new flowering trees.....his & hers  LOL  I love looking out my windows & seeing their beautiful, white blooms.  This spring I'm going to add a few Forsythia bushes, another early bloomer (with a little TLC you can force some early blooms to enjoy indoors as early as Feb. - love that!)  So here's a few pics. of my new beauties.

   I know I sound way too excited about some trees but those who know me know that I truly am a "tree hugger"  LOL  I remember celebrating the very first Earth Day.....our class went & cleaned up a park near our school.  I loved it & I still love the idea of Earth Day & I celebrate it in some small way each year, it's probably something we need now more than ever before.  So if you can, try to do a little something for Earth Day (April 22nd) if you get the chance, Mother Nature will surely appreciate it!
   Now for some blooms of the paper kind.   I have a spring-y card to share today that has lots of fun flowers.  Starting with this blooming paper from Basic Grey, such great colors, I love it!  I also used a cool printed flower & layered it with a fun handmade flower and finally a teeny, tiny, bling-y little bloom to accent the simple sentiment. 

   I also used some pp's from Paper Studio & Daisy D's (this fun green check is one of my all-time favorites!) as well as journaling spots from CTMH, tiny-type alpha stickers from Cosmo Cricket and these great chipboard borders that I got on clearance at Archiver's.  With it's sweet, simple message I think this card could be used for many occasions.

   So hopefully our chilly, breezy days are dwindling away and soon Spring will be in full swing.  Until then I'll just keep creating with my paper flowers & dreaming of warm, sunny days and playing in the dirt with some real bloomin' beauties.  Have a great day and thanks for looking,  delisa

Thursday, April 7, 2011

having fun with punches

Hi everyone!  I know it's been too long since I posted on my  blog, again!  But with so many projects going on around the house & spring cleaning underway also my time to craft & blog is limited these days.  But I do have some fun little mini cards & a few tags to share with you.  I love using flowers on my cards, especially for spring cards and I love all of the cool handmade flowers people are making these days, some of them take a little practice but many of them are very easy to do.  And if you still think you can't make handmade flowers yourself then I have some that I guarantee you can do.....quick & easy!!!
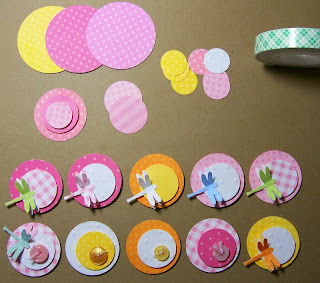
  I always save my paper scraps & have too many of them, so when I can I use them for little projects like these.  First I selected 3 different size circle punches & one of my favorite MS punches:  this cute little dragonfly.  I raided my box of scraps & punched & punched until I had a collection of pretty patterns to work with.  For the flowers I stacked the circles with a little foam tape in between each layer to give them some dimension.  I added a little button to some of the flowers also.

  For the dragonfly I punched 2 for each one and adhered the body section together & left the wings free so that I could score & bend them up to show the layer underneath, this looks good when you use 2 different colors/patterns for the layers.  Then I let a few of them land on my flowers just for fun!  I love how they looked all lined up on my desk waiting to take flight  : > 

   Now you have to admit these are about the easiest handmade flowers that you could ever create and most all of us have several sizes of basic circle punches in our supplies so next time you want to make your own embellishments.....piece of cake!  The dragonfly punch is too cute & I just love it but MS also has several butterfly punches that make adorable little additions to cards & projects.  So here's what I did with all of my fun decorations, more mini cards!  I have just had a ball making these tiny little (3" square) cards and I can't seem to stop!  LOL  I started with kraft cs (another thing I can't seem to stop using lately) and some more scraps from the stash box for the background papers.  I added my circle flowers, some hand cut leaves which I curl up a little for more dimension and grass made using Fiskars's cloud scissors and accented with a few stitches in a beautiful spring green.
   I picked up some pretty floss recently and want to start adding more handstitched accents to my cards but I also like to use it as I did on these for just a hint of color & a tiny bow.  It reminds me of the baker's twine that is very popular with crafters right now!  The stamped sentiment is from one of the little clear stamps sets by Hero that I've had for awhile.  I love this sweet little message, just right for spring  :>


   I also added some of my handmade goodies to a couple of tags for some fun, spring looks;  I may be using some of these on Easter goodies for my family & friends!  I also did one more little card to add to my collection, I just wasn't ready to stop  LOL

   I love the bright, fresh colors of spring.....I kept these cards & tags on my desk for days just enjoying looking at the cheery flowers, they just make me smile!  One more picture to share with you, it's something that makes Randy smile.....FOOD!  He loves my homemade mac & cheese and was so disappointed when he came home last week and I told him the big pan of mac & cheese I had just taken out of the oven was not for us but for a friend's family.  Soooooo, this one's for you baby!  gotta keep my guy happy LOL
   Yummmmm, it was good too!  It didn't last very long but there's plenty more where that came from.  So that's my post for today, I know it was kind of long but I hope you enjoyed it and when you get some time to play get out those punches and make some spring lovlies for yourself!  Have a great day & enjoy our beautiful weather while it lasts!  Thanks for looking & I'd love to hear any comments you might have,  delisa