Tuesday, March 15, 2011

sweet spring pockets

   Hi everyone!  I'm sorry it's been a little longer than I wanted since my last post, but I'm back with a fun spring project to share with you.  But before I do that I just can't go on without saying how much my heart & my prayers are going out to the people of Japan and the terrible, terrible tragedy that their country is dealing with.  The images & the stories coming out of there are just heartbreaking.....this morning I saw on tv an elderly man who was riding around on a bicycle with his wife's name & pictures of her all over his bike as he desperately searched for her and I can't even begin to imagine how he feels but I pray that he & all of the others who are suffering will get some kind of aid & relief soon.  As for his finding his wife, that's in God's hands.  If you are so inclined please pray for the nation of Japan & it's people, animals & land.  Sometimes that's all that we can do.....but it definitely IS something that we can ALL do.
   It seems trivial to think about working on crafts & things like that when so many are suffering but doing what is normal is the way that many of us cope with what is overwhelming to accept, so I'm doing something that is usually a part of my daily routine (along with laundry & other fun stuff like that!)
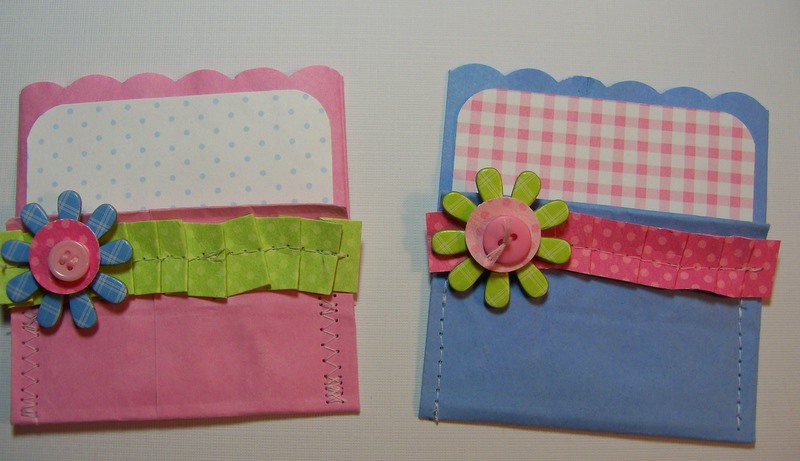
   So here is a fun little project that you could use to give small cards, tags & little treats to brighten someone's day or just to celebrate the (hopefully soon) coming of spring.  I have a pretty good supply of little paper sacks in different colors & sizes and I like to use them occasionally to see what kind of different projects I can do with them.  I made a few of these pockets around the holidays as gifts for friends & used brown paper bags so I thought it would be fun to do them in cheerful spring colors too.  So I some med. & small bags & trimmed the tops with my favorite "clouds" scissors.


  Next I folded up the bottom edge and stitched just a little way up each side (so that that I would have room to add some fun things).  Then I added a small patterned paper liner to the back, it doesn't go all the way to the bottom so it's easy to adhere.
   Aren't the little ones cute!  Next I cut some strips of paper & pleated them by hand & stitched down the center to secure them.  I added the paper ruffles along the top open edge of the pocket.  I went to my stash & gathered some chipboard flowers (I've had them awhile & don't remember where I got them but I'm happy to finally find a home for them  :>   I was going to layer them with these white embossed flowers but I tried some punched circles instead & I liked the added bit of color. 
   I layered the punched circles with foam tape between them for a little more dimension.  I love for things to be chunky, dimensional & look like they have some movement to the paper (like the ruffles.)  I gathered a few more things such as buttons, some pretty pink floss & I used one of my favorite little Sizzix dies to cut "bloom" from some scraps of the patterned papers.  I finally got around to picking up some little wooden clothespins at M's that I've been wanting to alter & use on my projects.  I just used my ink pads to lightly tint the clothespins.....I do front & back(???) then I let them dry and later add the tiny dots with white paint & the tip of a stylus.

   I adhered the layered flowers to the left side of the ruffled strip & the "bloom" sentiment in the bottom right corner.  If the paper is thin that you want to use for the sentiment cut an extra one out of scrap cs & adhere the two together for a thicker, stronger piece.  I even tried die cutting a sentiment from pink felt & it worked just fine  :>   hmmmmm.....I've got a pile of felt, this could lead to some marathon die-cutting sessions, we'll see!  I added one more fun thing to my embellies, I punched some little dragonflies from white cs with a MS punch, love her punches...very well made!
  So the final touch on my pockets was to add the clothespins & adhere a button tied with a bit of floss to top the flowers.   I love these handy little guys.....they can hold a small card or tag, even a yummy bit of chocolate (like the individually wrapped Ghiradelli chocolate bars  :>)   You can make these with pretty much any size bag you want, what a fun way to recycle those brown bags we all have a few of .

   I just love the silly little dragonfly...it's my favorite thing!  I don't know, whatever  :>   So I hope you enjoyed taking a look at my spring pockets & I hope it made you smile just a little too.  And for those of us living in the midwest:  hang in there, baby!  I'm sure spring is just around the corner.....I've been seeing some robins in my yard and the grass & woods are slowly greening.  Have a great day & happy crafting to all,  delisa

Friday, March 4, 2011

Thrifty Crafting

   Hi everyone,  Happy Friday!!!  It looks like a rainy weekend but we have alot of things planned so the show must go on  :>   The fun part is tonight.....dinner & a Pink Floyd concert (tribute band), it should be alot of fun & we're definitely looking forward to it.  Saturday & Sunday will be work days as we are finishing the rest of our basement (yep, I know more remodeling.....why do I do this to myself?) and have lots to do there.  It should be great when we get finished & I'll have to post some pics.  I may have to have another Spring Fling for the MM girls  :>
   Now for something a little more fun.  I've been on a mission for the past year or so to pare down some of my huge stash of craft supplies & scraps of papers & embellishments leftover from other projects so I try to do a "scrap craft" once a week using these items.  This week I chose to use a pkg. of cute chipboard from K&CO that I picked up on clearance.  When I opened the pkg. I noticed how cute the cardboard backing was & since it was fairly lightweight I decided to use it too on my projects, which makes the buy an even better deal.....now that's being pretty thrifty I think!  My husband would be proud of me.  So I also selected some scraps of kraft cs & pastel patterned papers from my stash, a little rick rack (which I have in many colors, it's kind of a staple for me) along with some pretty pink buttons.....something else I have tons of, a little light pink floss and some tiny alpha stickers from MM that I also got on clearance and have used on many projects.  I gathered all of my goodies  together in front of me & was inspired to make some spring cards   :>  I had enough kraft paper scraps to make some 3" cards & also one 4" card.


   First I cut & scored my cards & rounded off the top right corners with a punch.  Then I cut tiny pieces of the cool pkg. backing and added that along with a scrap of dotted green paper cut with Fiskar's "cloud" scissors (I love these.....they're probably my most used decorative scissors!).  I was trying to figure out where to use the bright pink rick rack & so I tried it around just half of the card & liked it just like that!  There wasn't alot of room on the cards for a ribbow bow, which I add to most of my cards, so I just used some of the pink floss to make a tiny, just barely there little bow  :>  For the 4" card I used just a little square of the background paper & a scrap of blue dotted paper cut with a scalloped edge.  This time I used the floss tied around the journaling block.

   The next step was adding the cute chipboard pieces.  They might seem kind of large scale for such tiny little cards but I think they work just fine.  I added a pink button to the floss bow & used the alpha stickers to spell out the sentiments.  The stickers were almost the same color as the background so I decided to pop them up with foam tape to make them stand out a little more.  I had a few colored alphas as well and used them along with another leftover sticker to spell out the " hi u".  These were fun to make and I LOVE using things I have on hand or have had for awhile.


   I was going to decorate these cute envelopes I found at Archiver's but the cards ended up being too wide to fit so I came up with a fun solution which I'll show you in my next post.  So I hope you like my little cards and challenge yourself to do some "scrap crafting" of your own.  I still have supplies leftover from this challenge and have another cute project to share with you but that won't be until next week.  Hope you all have a great weekend & try to fit in a little crafting time if you can,   delisa   :>

Tuesday, March 1, 2011

happy one-sie!!!

   Hello!  Happy March!!  It's a beautiful day here in the midwest.....sunny & almost 50 today, whoo hoo!  we need a nice day.  Hopefully spring will not be too long in coming.  I have a fun project to share with you today, it's a little album for my great niece's 1st birthday. I found these cute little chipboard albums shaped like a onesie at Archivers and thought it would be perfect to celebrate turning one  :>  I bought several of these & I'm thinking I may be making more of them (for grandma & great grandma).  It was so much fun making this for such a sweet & happy little girl, I really enjoyed working on it.


   I used papers that I already had in my stash & just a few little embellishments.  I didn't have alot of pictures to work with either so I tried to get creative with what I had and I reallly like how the "flower frames" turned out.  I think my favorite page of the album is the yellow one with "happy" on it,  I just adore this picture of Poodle (her family nickname) because she's always such a happy baby and this captures her perfectly.  The yellow outfit was embossed on Coredinations cs and lightly sanded.  The big polka dot flower is from a tin of chipboard that I've had for a few years and the fun dotted alphas were a bargain buy at Tuesday Morning (I know.....ya never know where you're going to run into some cool scrapbooking supplies.)


   I just love this yummy little felt cupcake with the sweet embroidery stitching.....oh, so sweet!  It's from the "woolies" line of felt stickers by one of my favorites, Basic Grey, the package says "super cute woolie felt stickers with just a wee bit of stitching, buttons and bling"!  I love it!  I also used lots of the little alpha stickers, love those too, they seem to be just the right size for cards & small projects.  I also used an embossing folder on the white page and trimmed the little collar & cuffs with tiny pearl strands (J's) and added a pink handmade rose.


   I cut a scalloped edge on the pink page with decorative scissors and added fun button snaps to the bottom.  I layered on some flowers and dressed them with a bow & a tiny sparkly flower.  What a sweet baby!  For the last page/back cover I used simple, sweet pink gingham & a fun frame from Cosmo Cricket along with a really old chipboard heart from Heidi Grace that goes perfectly.  A shimmery double bow & birthday wishes complete my gift album for this precious little one.  You could use the chipboard pages separately for some really cute cards also, I would add my bow where the little hole is and put the sentiment on the back.  So many cute things you could do with these!


Last , but not least, I had to make a card to celebrate the big day so here are a few pics. of that. 
I like the fun colors & the orange & pink glittered tiger just makes me smile!  The rub-on sentiment has a little shimmer to it also, I don't know if that shows in the pics.  I used decorative scissors, a tiny bit of bling and layered on some flowers topped with a little stack of buttons. 


It's so nice to have little girls in the family & get a chance to use all of the soft, sweet, pink-y things that girls love. I hope you all have a great day.....enjoy this beautiful sunhsine, I'm going outside to do just that. Thanks for looking at my project & I'll see you soon, delisa